The EdTech Coach Podcast

Showing posts with label google slides. Show all posts

Wednesday, April 25, 2018

11 Apps That Foster Student Collaboration


1. Explain Everything: The well-known whiteboard where groups of students can work on a project together.  Anyone with a link/code can edit.

2. iMovie: A great way to get students to work together!  Making a movie forces groups of students to collaborate, by virtue of the app.  Someone can direct while others act.  And, they should be working from a script, which they all collaborate on as well.

3. Voicethread: Have students put together interviews, conversations, or theatres of the mind.  Ask them to collaborate on a script and the actual voice recording, with students playing different parts in the audio recording.

4. Google Docs & Slides, Apple’s Pages & Keynote: All of these productivity apps can be used collaboratively.  Use them to take collaborative notes, write dialogue as a group, create slides etc.

5. Book Creator for Chrome: Have students create a book on whatever topic you choose.  And the cool thing is, they can do it collaboratively.  Students invite their partners to their library and they can work on a book together.

6. Padlet: Each group can create a thinking map.  Students can use Padlet to address a question or explain the steps in a process, perhaps how to solve a math problem.

7. Popplet—Great on the Chromebook!  Students use the share button with their partners to collaborate on timelines or graphic organizers.
  
8. Recap: Pose a complex question to groups of students and ask each student to contribute to a discussion.  Ask students to present their answers to the rest of the class.

9. Google Drawing: Life Google Docs and Slides, students can collaborate on a poster or drawing, working on the project at the same time in real time.

10. Canva: Students can work together creating posters, photo collages, or infographics.  Students simply share their creation with a partner and their off and creating together.

11. Evernote: Have students share a notebook.  Then, they can work on a piece of writing together or add different entries in a journal style writing assignment.

Wednesday, March 28, 2018

22 Ways Students Can Demonstrate Their Learning


Think of this as a compendium to my last post about students creating content.  This time, my focus is not on the creation of content, but ways that students can demonstrate what they’ve learned.  Twenty-two apps that can help students show-off what they’ve learned include:

1. Annotable:  A fantastic tool to annotate pictures or documents.  Students can annotate pictures they’ve taken, labeling different aspects of the picture.  In biology class, students can take pictures of plants etc. and label the parts.

2. Skitch: A great annotation tool.  Use it to annotate pictures, drawings, documents, etc.  Students can use it to label certain aspects of a picture.  They can use the picture of a particular person and label their attributes and/or accomplishments.

3. Popplet: Students can use Popplet to create a web of knowledge.  They can use it to explain a concept, map out a family tree of a famous person, or create a timeline.

4. MindNode: Great for thought-mapping.  Use MindNode to create timelines, explain the process of a science experiment, or show how to solve a math problem.

5. Explain Everything: A digital whiteboard.  Students can record themselves explaining a concept while they use the digital whiteboard to show what they’ve learned.  Then, show it to the class.

6. Educreations: A fantastic digital whiteboard.  Students can use Educreations to record themselves explaining how to solve a math problem or explain certain aspects of history.  Then, when done, show it to the class.

7. Shadow Puppet EDU: Create videos.  Include voiceover narration with pictures and graphics.

8. ShowMe Interactive Whiteboard: Students can demonstrate a concept or explain the significance of a person or event through their white board.  Students record their report and can play it back for the class or export it to the teacher.

9. iMovie: What better way to show off you you’ve learned than to make a movie about the topic.  No matter the subject, from math to social studies, students research their topic, film it, and present it to the class.

10. GarageBand: Students use GarageBand to record a podcast about their topic.  They can record an audio report or a conversation between two or more people.

11. Recap: With Recap, the teacher poses a question where students can respond with text or a video reply.  Other students can join in by replying to each other’s post with a video or text.

12. Flipgrid: Using Flipgrid, students video record their responses to a question.  Or, like Recap, they can comment on each other’s post.

13. Paper by 53: Paper is a drawing tool for iOS.  Students can use Paper in a multitude of ways, from drawing a concept to  writing text.

14. Paste by 53: Paste is available as an iOS app or a web application.  Paste is a presentation tool of sorts in that it allows the user to create presentation decks from screenshots, videos, docs, as well as links to other sites.  Works great with its sister app, “Paper by 53.”

15. Keynote/Google Slides: Whether your class is using iPads or Chromebook’s, Apple’s Keynote and Google Slides are a great way for students to present information on their topic.  Each app allows for the insertion of pictures and video to accompany their text.

16. YouTube: Students can share what they’ve learned using YouTube.  The teacher sets up their own YouTube channel where students can upload their videos about their topic for the class to view.

17. iBooks Author: Using a Mac, students create their own digital books about a topic, including videos, recordings, and other interactive elements.

18. Seesaw: Seesaw is the ultimate in digital portfolios.  Students can upload their work to their Seesaw journal or address prompts from the teacher right in Seesaw.  A great way to show what students have learned over the course of a semester or year.

19. Weebly: Using Weebly, students can create a website about their topic.  Whether it’s a historical figure, event, or science topic, a website is a great way to have students research and present a topic.

20. Animoto: Ask students to use Animoto (iPad) to create video essays.  Student simply important the pictures, such as a historical figure, then choose the music and video style and off they go.  Add to the video with captions explaining the pictures and topic.

21. Grafio 3: A mindmap and diagraming tool.  Grafio for iOS allows students to create how to diagrams of ideas and concepts.  Students can create tree maps of historical figures and events.

22. Stick Around: Turn the tables on your students.  Instead of you creating the quiz on a topic, ask your students to create a labeling quiz for their fellow classmates.  Stick around is an iPad app that allow's students to create their own labeling quizzes.  In creating a quiz, students must provide the answer key.  In order to create the questions, students must know the answers.

Sunday, March 12, 2017

Present with Maximum Student Participation with Pear Deck


I can't tout how great Pear Deck is enough.  If you want maximum student presentation during a presentation, you gotta use Pear Deck!

Pear Deck is probably the app that I use the most.  It works like any other presentation software.  You add slides using the Pear Deck editor or you can import your own from another presentation app, and add to it from there.  The thing that separates Pear Deck from PowerPoint, Keynote, and Google Slides is that the students participate IN the slide show!

What do I mean by "IN the slideshow?"  Well, instead of the 20th Century way of passive participation, with the students taking notes as the teacher presents the information, with Pear Deck, the students are forced to answer short or long answer questions, draw, answer multiple choice questions, or choose from true or false.  Students simply login with their Google for Education accounts and away they go.

Another cool thing is that they can see their answers as well as their classmate's answers projected at the front of the classroom.  They get a kick out of seeing each other's drawings and answers to the various questions.  To top it off, the students can receive a copy of the Pear Deck along with their answers for use as a study guide when the Pear Deck presentation is complete.

Teachers are in control with Pear Deck.  They have a dashboard where they can see every student's answers, set a timer for particular questions, and set it so students can work at their own pace through the slides.  At any time, the teacher can show student answers on the front screen.  Students aren't afraid of answering for fear of what their classmates might say with Pear Deck because answers are shown anonymously.

Granted, in order for Pear Deck to be effective, students have to have their own device connected to the internet.  In today's education world, more and more schools are either equipping themselves with Chromebook carts, iPad carts or are one to one with their devices so devices are becoming less of an issue.

Pear Deck is also compatible with Google Classroom, which makes it easy to import rosters and share the "takeaway" after the presentation is over.

If you haven't checked out Pear Deck yet and have access to devices for your students, there's no better time than now to give it a look!  Go create your first Pear Deck!


Saturday, February 4, 2017

Ten Great Uses for Google Slides in the Classroom


Ten Great Uses for Google Slides in the Classroom


Google Slides is not only useful for teachers to present information, it’s a great tool for students too.  Here are ten great ways Google Slides can be used in the classroom:

1. Use Google Slides Q & A.  This is great way to be interactive with your class while presenting a Google Slide deck.  While in the presentation, click the drop down menu.  Select presenter view.  Make sure you’re in “Audience Tools,” tab, then press “Start New.”  A link will be generated at the top of your presentation that can be accessed by any device.  Students can ask questions which will be seen by you in real time.

2. Students create vocabulary slides.  Students can use each slide to describe vocabulary words.  Put the word on the top of the slide, ask students to include a definition as well as pictures from the internet that describes the vocabulary word.

3. Use it for introductions.  This is great at the beginning of the year.  Not only do they tell the class about themselves, but they are also introduced to the idea of using technology in the classroom which sets the tone for the rest of the year.  Students create a Google Slide show describing themselves with not only text, but find pictures from the internet and include them in their presentation.

4. Create a timeline.  Students create a timeline of events by using each slide as a particular part of time.  This is great for a history class.  Each slide can contain a year, a description, and pictures that represent the event.

5. Note taking at their own speed.  Students review the Google Slides presentation and write down the notes at their own pace.  After taking the notes, the students can be required to complete a question sheet or Google Form assessment based on the notes.

6. Play Jeopardy!  There are Google Slides templates out there that you can copy into your Google Drive and edit as you please.  Great for a review game.

7. Create a PDF ebook.  Creating a PDF ebook is a good way to create your own study guide or other information that can be easily given out to the students.  Simpler create a slide presentation and download as a PDF.  Distribute as you please.

8. Create a Story Book.  This is great for summarizing information.  Much like a timeline, students scour the internet finding appropriate images to go along with their story. Each slide contains a piece of the story and an appropriate picture.

9. Create a class shared presentation.  Another cool way to review.  The teacher would create a Google Slide presentation and assign a slide to each student in the class with a particular topic attached to it.  Share the slides with the class and have each student complete their individual slide.  Share the slideshow with the class when complete.  This works for assessment as well.  Assign each student a certain slide with a particular question.  Share the slides and have each student answer their assigned question.  Share the questions and answers with the class.

10. Take the class on a virtual tour slideshow.  This is a great history exercise using Google Earth or Google Tour Builder.  Students can present a tour of a historic place by simply taking screenshots of a particular location and pasting it into a Google Slides presentation.  Walk historic places and battlefields.  Show where historical events occurred.  In language arts, show where a particular story takes place.  

Tuesday, July 26, 2016

Training for Google Apps is Just a Click Away.


If you haven't heard, Google has made a new extension available called Training for Google Apps.  If you're new to Google Apps or just want to know more about them, you MUST install this extension.

One of the many cool things about the extension is that it's app specific.  By app specific, I mean that if you're in Google Slides, clicking on the training icon in the upper right will present you with a plethora of training videos about Google Slides.  For example, if you're putting together a Slides presentation and want to insert a video but aren't sure how to, simply click on the Training for Google icon and scroll to the video.

And, as the name implies, training is not only available for Google Slides, Docs, and Sheets, but it's also available for other Google Apps such as Google+ and Google Calendar.

I can really see the value for not only teachers but students as well.  Now, there's little excuse for a student not knowing how to insert a chart or copy a slide in Google Slides or how to rename or copy a Google Doc.

I couldn't recommend installing this extension enough.  If you use Google Apps, installing is a no brainer.

Sunday, July 17, 2016

Start Your School Year Off With This Tech


For some, it's way too early to talk about the beginning of the next school year. For others, the next school year is just around the corner.  I know that some teachers have the same routine year in and year out for the first couple days of school.  But, with technology slowly creeping more and more into the classroom, I thought I'd offer a few ways to change it up a bit and set the tone of the school year with some tech.

1. Peardeck:  I've touted Peardeck as a great way to engage your classroom.  Start the year off using Peardeck to have your students introduce themselves to you and their classmates.  Students can use Peardeck to either draw or write about themselves, all the while having it displayed on the projection screen.  You can also pose various questions to students about their likes and dislikes, showing the results on the big screen in front of the class.

2. There are a couple of ways you can use Google Slides.  First, have students create a Slides presentation about themselves, which they can share with the rest of the class.

3. The second way to infuse Google Slides into the first day of school is to use Google Slides Q & A.  Pose different questions about likes and dislikes, as well as finding what their interests are.  You can even prepare a pre-test to get an idea what the kids know or don't know about the subject.  Ask students to pose questions about the class itself as far as rules and procedures go.

4. Introduce the students to the world of blogging.  Use Kidblog to have the students blog about themselves.  They then share it with their classmates.  Have the readers pose questions to their classmates in the comments section.

5. In much the same way students use Peardeck, you can use Google Drawings.  Have students create illustrations about themselves.  They can search the internet to find pictures that represent who they are.

So there you go, just a few ways to introduce your students to the tech you may be using during the year.  Feel free to share how you use tech in the classroom on the first day of school.

Friday, June 17, 2016

Got the summer school blues? Use these online tools to brighten your day!


Summer high school teachers, we've all been there.  You have one class with the same students and the same subject for the entire day.  The day is dragging. Lecturing for hours is out of the question.  Having the students do book work for hours upon hours can be pretty boring and really make your day drag. But now there's The Internet and GAFE!  Make the day zip by while having your students learn the subject matter using online apps.

You say you don't have access to computers or a computer lab, well, there are ways around that, especially at the high school level.  Knowing that most of your students have cell phones will set you free of a day of classroom monotony. And, even if not all of the students have phones, they can still partner up with those that do.
Here's some ideas:

Socrative is a great way to spend a summer class session. Split the class up into teams using just a few cell phones and boom! You've got fun learning that can last as long as you need it or want it to.

Quizizz is another great way to keep the troops entertained while there is actual learning going on. Again, split the class into groups based on cell phone availability and review the days topic with your students. You can creamy a quiz beforehand or quickly use one that has already been created.

Pear Deck is a good activity to use when other reviewing content or going through it for the first time. Split the students into pairs and pose different questions to each group and have the students take notes on their classmates answers. Assign different parts of a text to different pairs and have them present the main points through Pear Deck on the big screen for all to see.

Google Slides Q & A could also work with pairs.  Have the students pair up and ask them to come up with questions or comments about the Google Slide presentation that you've given.  Students enjoy seeing their questions and comments on the big screen in front of the class.


Sunday, May 8, 2016

Get Interactive with Google Slides Q&A

After hearing about the new Q&A feature in Google Slides and knowing I was going to give a Google Slides presentation the next day, I knew this was a great opportunity to try it out.  I'm happy to report, all went swimmingly well!


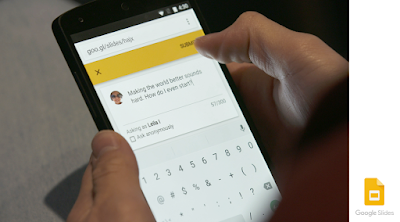
If you haven't heard, the new Q&A feature in Slides enables viewers to ask questions while you're delivering your presentation.  Now before you say, "What's the big deal, why not raise your hand and ask a question?" Well, it's not so much that you can ask a question, but how Q&A enables the participants to do so.  And in a classroom environment, Q&A sets those shy students free to ask questions at their will.

Oftentimes, a participant has a question during a presentation, but the presenter may only take questions at the end, asking them to hold onto their question until the end.  Unfortunately, when the time comes to ask questions, the participant has forgotten what they were going to ask.  Q&A solves this by letting questions be asked as soon as they strike someone's fancy.

To enable the new feature, open your Google Slides presentation and click on the down arrow next to the "Present" button.  From there, click on "Presenter View."  Make sure you're on the Audience Tools" tab and click "Start New."  Above your presentation will appear an address from which your students can ask a question regarding your presentation from their preferred device.  The question can be asked anonymously by clicking a check box.

While presenting, you can see the questions as they're being asked.  Participants also have the ability to choose which questions they like and want answered the most.  So, at the end of your presentation, you can see which questions were more popular and address those first.

In my high school classroom, I found that students are much more actively engaged during a presentation than they otherwise would be, having to really pay attention to ask relevant questions.  And, as I mentioned before, those students that are too shy to raise their hand have been set free to ask questions to their heart's content.

There's another reason why today's high schooler might be more excited about a presentation--they get to use their cell phones!  The glee in their eyes when I asked them to take out their cell phones and go to the listed address to participate could have brightened up a room.  I told each of the students to come up with at least two questions and to vote on at least two others.

The new feature in Slides is great and I know I'll use it often.  Check out this video to see Q&A in action https://youtu.be/nFMFXSvlXZY.


Saturday, April 9, 2016

Google Slides and Google Classroom: Note-Taking At Your Own Pace.


Most of us have been there. You're lecturing on the topic at hand, using your particular presentation software of choice and a projector. You've thoughtfully put together each slide, detailing what the students need to know, when, after clicking to the next slide, you hear, "wait!" Another student exclaims, "you're going too fast, please slow down!" 

I was reminded of this after reading the article "My kid needs a teacher, not a Chromebook," http://goo.gl/n873yL.  The article discusses the value of taking notes, whether its done in the classroom or whether they're taken out of the textbook. It goes on to say that the introduction of Chromebooks have all but negated note taking in the classroom. I agree with the notion cited in the article that when students write information down, they're more apt to remember it. 

This is where Slides and Google Classroom come in.  Instead of presenting the slides to the students in the classroom as a whole, a teacher can put the notes on Google Classroom.  Students can then write the notes down, at their own pace, on a piece of notebook paper. 

Let's face it, we all write and comprehend information at different speeds. And it can be frustrating for not only a teacher, but for some students as well, when a few students slow the class down because it takes them a few more moments to write down the notes. And, coupled with Google Forms, you have yourself a great little note-taking exercise. 


By marrying Google Classroom with traditional note taking, a teacher can have the best of both worlds. The students are taking notes in a traditional way, writing them down on a piece of notebook paper, and at their own individual pace. The teacher can take the note-taking one step further with Google Forms.  After taking down the notes, the students can complete an assessment of the notes using Google Forms. The students will use their notes to answer the questions in the form. 

So there you have it! Technology and traditional note-taking, old school and new school if you will, living in harmony.