The EdTech Coach Podcast

Showing posts with label ipad education. Show all posts

Wednesday, March 27, 2019

Five Apps for Taking Notes On Class Reading


I was observing an English class recently where the teacher was discussing a piece of text with students. He was telling the students what the text was about while the students listened. Student engagement was at a minimum, with the students at the front of the class occasionally engaging with the teacher while the students in the back seemed to be counting the minutes until class was over. 


It must be said that this is a one to one classroom, where each student has their own Chromebook. Never mind that engagement was at a minimum, but the students had technology that could have made the whole process easier for the teacher to check for student engagement while being more engaging for the students!

Three apps that can help engage your students when discussing a text passage in the classroom are:

Google Slides:  Students can use Google Slides to summarize information and keep it nice and orderly. Simply title each slide by chapter or even paragraph.  Each slide can contain a summary, a wondering, or even discussion questions that pertain to a particular part of the text.

Kami: Kami is a fantastic pdf online annotation app that works great with Chromebooks.  Students can upload the document into Kami then annotate with text and highlights. Or, if the teacher has a pre-made note sheet, they can upload the document as a pdf where students can then upload the note sheet to Kami, complete the sheet, then upload it to an LMS such as Google Classroom

Google Keep: Google Keep is an indispensable notes app that ties neatly into the Google ecosystem.  It's on the students Chromebooks, making it ready to use.  And, one of the cool things about Google Keep is that it goes everywhere there's an internet connection.  Students can access their notes from virtually any device with an internet connection.  And, when the teacher wants to check student notes, students simply share them with the teacher via the share button.  No paper collected or returned.

Nearpod: Nearpod is a very good interactive presentation app that works well with both iPads and Chromebooks.  Use the open ended question option in Nearpod and attach the document for reference.  Ask students to summarize a chapter or paragraph per slide.  As the teacher, you get instant feedback on your own device as students submit their responses.

Google Sheets: Did you know that a spreadsheet could be used to take notes?  Well, it can.  Fill column A with chapter or paragraph numbers.  Then, title the rows as necessary with such things as summary or with questions.   

Saturday, March 23, 2019

Two Apps That Will Move You Toward A Paperless Classroom


I was recently in a Social Studies Department meeting.  The topic turned to a discussion about when they’ll get more printing paper for their classes.  Not being familiar with the number of cases of paper teachers received from the school, I asked how much paper they were given.  I was told they received a case of paper per semester. 


They noticed my surprised look and stated that it was still not enough.  And, here’s the kicker, their students have Chromebooks assigned to them! It’s a one to one school!

There are many reasons to go paperless with some classroom assignments, among them is time saved at the copy machine.

Teachers could save a lot of time by going paperless with these apps:

1. If you’re using Chromebooks in your class, you gotta check out Kami.  Kami is a fantastic PDF annotation web app.  Students can open up a document in Kami, annotate to their hearts content with text boxes, highlights, or with their stylus, and then upload it to your LMS.

2. Whether you’ve got iPads in your class or Chromebooks, the Showbie app is an easy way to go paperless in your classroom.  Showbie is available on the web as well as an iOS app.  Upload a PDF to Showbie and students can annotate with a text box or drawing tool.  Showbie also allows students to highlight text.  One of the really cool things about Showbie is the ability for students to leave a voice note on a document.  Showbie can also serve as an LMS of sorts in that you can distribute and collect work. 

Tuesday, February 26, 2019

5 Apps For Student Field Trip Reflections

Your students are going on a field trip.  Perhaps they're headed to a natural history museum or art museum.  You want to make sure they go away with something--anything that proves that the field trip was worthwhile.  The simplest thing to do is assign a reflection of what they learned on the field trip.  


Make sure students are aware of the assignment beforehand so that they can prepare.  Allow them to use their smartphones while on the field trip so they can take pictures or write notes about what they learned.  

The following apps will help students share what they learned on their field trip:

Google Slides:  One of the easiest ways students can reflect on their field trip is by creating a presentation about it.  Slides provide a couple of templates tailored to field trips-the field trip template or the photo album template.  Or, students can create a presentation from scratch. Students can insert pictures or videos they took of their experience.

YouTube: Students can use their phones to shoot video, edit it, and upload it to YouTube.  When shooting video, advise students that they should include a piece from the visit and their thoughts on the topic.  At the end of the day, ask them to film a reflection of what they learned.

Storyboardthat: Students can use Storyboardthat.com to upload a timeline of their learning.  Use each box to document the day. Students can upload pictures from the day and include written comments.

Book Creator: Students can use Book Creator to create a short book that shares their field trip.  They can add different kinds of media such as photos, video, and sound.  Book Creator provides the students with the ability to create a comic book style book that can showcase their field trip.

WeVideo: WeVideo is a free all in one video app that allows students to shoot and edit video.  WeVideo has an iOS app for those iPad classrooms and is available on the web for those Chromebook classes.  It’s easy to use and students can create and edit video right on their mobile device.  

Friday, February 22, 2019

The Digital Assessment Tool You Need To Try In Your Classroom


We all know that having a formative assessment as part of your class is an important part of teaching.  With that said, there are a plethora of formative assessment apps out there, many of them really good.  From Socrative to Kahoot, they can tell you what your class knows and doesn’t know.   One that I’ve been using lately is Formative.


Formative is like many other formative assessments out there.  As the teacher, you can create questions such as multiple choice, true/false, and short answer. 
I’ve found that there are a few things that set Formative apart from other assessment apps out there:
First, you can watch in real time on your computer dashboard as students answer questions.  You can also throw in your two cents as students work, leaving digital feedback on their work as they do an assignment. 

The second thing that separates Formative from an app like Socrative (don’t get me wrong, I love Socrative) is that Formative includes a library where you can search for pre-made Formatives.  Looking for something on Ancient Greece? Check out the Formative library, there may be one that pertains to the subject matter that you’re teaching.  If you find one that you like, you can add it to your account and edit it as you please.

Formative allows you to track your students progress. Click on the “Tracker” tab and you’re presented with a nice graphical representation of how your students are performing your tasks. 
If you’ve If you got an old worksheet laying around, or information text sheet, give it new life!  Formative will let you upload your document in your Formative.  After uploading, you can add questions and/or notes on top of the document.  Your students can then add answers or comments to your documents. 

And lastly, Formative works great with Google Classroom. If you use Google Classroom,  you’ll find that Formative fits in quite nicely in that it includes a link to share to Google Classroom.

If you haven’t check out Formative, I highly recommend giving it a try. 

Monday, February 11, 2019

Use These 3 Apps for Pre-Assessment!


I was in a class recently where the teacher was beginning a new chapter. Instead of asking the students to open up their Chromebooks for a pre-assessment, she orally posed questions and asked for responses by asking kids to raise their hands. Her twenty-five student class remained mostly silent, with one student raising their hand to volunteer what they thought they knew, the rest of the class--crickets! Unfortunately, there may have been students that did know about the topic but where afraid to take a chance in front of the class.


When beginning a new unit, chapter, or topic, it's important to find out what your students already know about the said topic so as not to waste time covering material that the students already know. In the age of technology, apps can make this process easy and, depending on the digital tool, incorporate the pretest directly in the lesson.

Pre-assessment should be painless. Painless in a sense that you don't want your students to be timid in answering your assessment questions. You want them to give it their best shot, not being afraid of getting the question wrong. After all, it's not so much about the individual student, but about the data that you'll glean from your pre-assessment.
You want to know what your class already knows.


Socrative: Socrative is a great formal assessment tool. And, it can be handy for pre-assessments. Create a quiz and turn it into a racing game, where students try and answer all of the questions correctly in order to win the race. Then, at the end of the race, Socrative provides data on how your class answered each individual question.

Kahoot: Again, gamify your pre-assessment with a Kahoot. Always competitive, Kahoot engages students by presenting timed questions where students have a limited time to answer. Like Socrative, Kahoot provides a report on how well your students answered the questions so you can determine where you need to spend more time on your upcoming lesson.


Pear Deck: A fantastic interactive presentation tool that allows not only for student participation by typing in their answer but also allows them to draw their answer. Pear Deck has built-in templates asking students what they want to know about the upcoming topic while another asks them to draw what they already know about the topic.

Tuesday, February 5, 2019

Two Ways to Automate Your Teaching Life


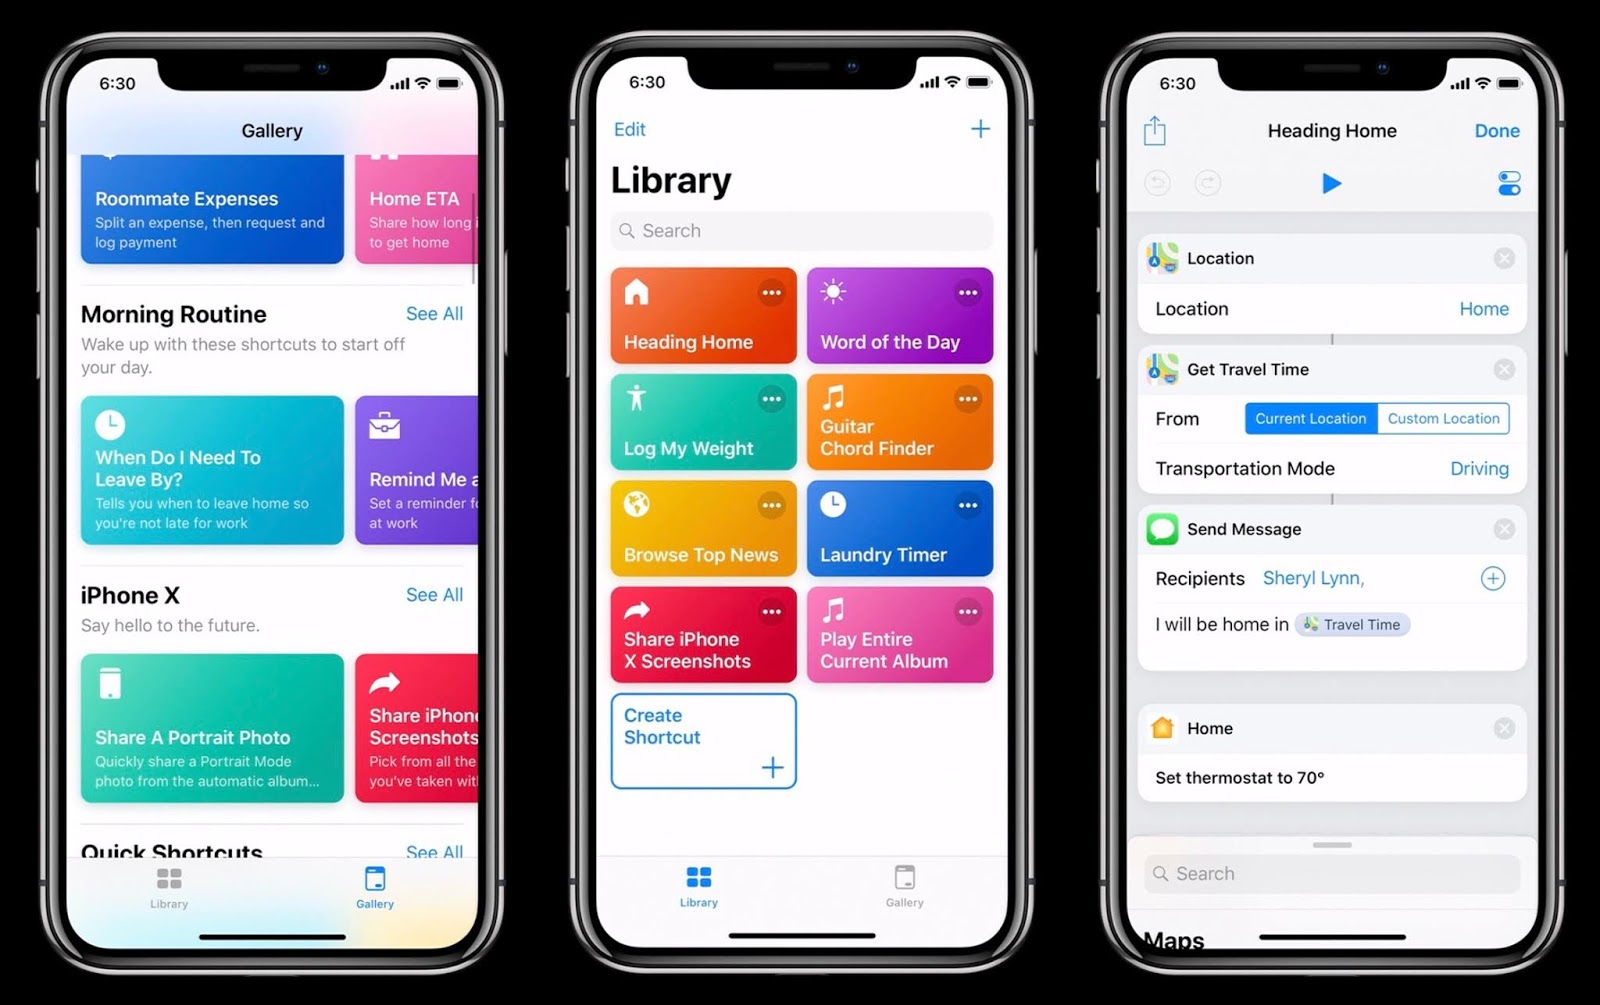
As a teacher, your time is precious. Time saved in your teaching tasks can be better used elsewhere in the classroom.  There are two apps that can save you time while helping you get stuff done.  For iOS and Android, there's IFTTT (If This Then That) and Shortcuts, an iOS exclusive.  They both essentially automate tasks, combining different functions, therefore saving you time and helping you get more done.


IFTTT is reactive in that if you initiate a task, then it will initiate another.  For example, if a new photo is taken on Instagram, the image will also be tweeted to the users Twitter account, therefore saving you the step of opening Twitter and tweeting the picture.  If you have a file you want to sync to Dropbox, IFTTT gives you the ability to also save those files to Google Drive, therefore automating the tasks.  If you want to make sure and not miss an email attachment, you can configure IFTTT to save your email attachments to your Drive or Dropbox.  There are countless ways to use IFTTT in your teaching life.  Simply open up the app and explore the countless ways you can find it useful in getting things done all the while saving you time.

The Shortcuts app is only available on iOS.  It's kinda the same idea as IFTTT in that it can automate your workflow (which is what Shortcuts was previously called).  But with Shortcuts, you create an action by adding different apps together to automate a task and get it done quickly.  For example, I created a shortcut where I can enter text, which creates a PDF, and asks me where I want to save the PDF, either to iCloud Drive, Dropbox, or Google's Drive.  As a teacher, I find this handy if you'd like to create a quick PDF and share it with your students through Google Classroom or any other LMS.  Like IFTTT, the Shortcuts app has a gallery from which you can choose already make workflows.

You owe it to yourself to check these out.  But don't get overwhelmed by the number of tasks that they offer.  Start out finding one or two things you do often that you'd like to automate, especially with Shortcuts.  Then, venture further and create your own Shortcuts.

Monday, February 4, 2019

8 Ways to Have a Digital Teacher Community


Teachers are busy. Between parent meetings, staff meetings, and lesson planning, it can be tough to find time to meet with your department or colleagues on an individual basis. One of the best ways to cultivate a professional learning community is through technology. No longer do you have to carve out time to have a sit down with your department members, you can do it virtually, when you have time. Unfortunately, Google Plus is going away and not everyone has a Facebook account (or perhaps they've left Facebook recently), so how can you get together with your learning community? We'll, like they say, there's an app for that!

Slack: Slack is a good way to post documents for your team members to review. It's also a great way to chat with anyone in your department without having to have their phone number. Twitter: With Twitter, your department can hold a virtual meeting using a specific hashtag. Or, you can tweet a question or comment to your staff or an individual. Pinterest: Your department can create a Pinterest board where they can share documents and student work. Google Classroom: If you're using Google Classroom, it's easy to adapt to using it as a PLC. Create a new Google Classroom for your department where you can post comments, questions, and documents for your PLC to review. Edmodo: Edmodo already has a virtual community where teachers can share resources and ask questions. Create a new class in Edmodo where your colleagues can communicate. Seesaw: Create a new class titled with your department name. Seesaw allows for the sharing of documents and individual posts. A cool feature in Seesaw allows for the creation of a blog. Share the blog with the rest of the staff or admin so they can see the fabulous things you're discussing and sharing! Schoology: Like Google Classroom, you can set up a class for the staff or for your department. In Schoology, you create groups based department or grade level. Easily share documents and post to share questions and comments. Flipgrid: Use Flipgrid as the students would, by discussing a topic and having others comment on it. Staff can post questions, comments , or share what they're doing in the classroom. Other staff can ask questions or comment on the Flipgrid.

Sunday, January 20, 2019

Eliminate Classroom Distractions With This Tip

It's all about the "e" word.

Technology in the classroom can be a great tool for learning.  It opens up many possibilities for students to expand their learning opportunities. But having technology in the classroom can bring its own set of challenges.  Along with knowing how to use it as an effective teaching tool, tech in the classroom can present the challenge of student distraction.  Put a Chromebook or iPad in a students hand with little engagement, and, unless you follow certain protocols, the students might find other uses for the tech, such as playing games or visiting unauthorized websites. 


Sure, there are various ways to try and combat student distraction.  The teacher could let students listen to music while they work.  They could provide for phone breaks, where the teacher sets aside a designated amount of time during class where students are allowed to check their phones for notifications.  Another might be to have students sign a contract where they’ll adhere to class rules about tech use in class.  The contract is then displayed in class with all the signatures so the teacher can refer to it as needed.  And lastly, the teacher can have students keep a daily to-do list, helping students to stay focused on the tasks that need to be finished.

Some of these might work in your class, but there is one sure-fire way to keep your students engaged...make engaging lessons!  The answer is that simple.  If you make engaging lessons, classroom distractions will be nullified.  I know it’s easy to say “just make an engaging lesson.” But believe me, once the effort is put into a lesson with student engagement in mind, your distraction problem will melt away.  There’s a two-part formula to making your lesson engaging:
First, students need to know why they're doing what they're doing.  Tell them how this lesson is going to build on the next.  Make the lesson relevant and meaningful.  Use real-life examples of how what their learning applies to them and the real world.

Second, fight fire with fire!  Use the appropriate tech tool to keep students from being distracted Deliver an engaging lesson using engaging apps such as Pear Deck or Nearpod.  Nearpod and Pear Deck are built to provide interactive features that keep students involved in your presentation.  You know the old saying, “Idle hands...”.

You can also keep the students involved with Socrative or Kahoot.  I’ve written before about Kahoot’s question template and how students can contribute their own questions to a Kahoot.  Knowing they’ll have an authentic audience for their questions will keep students on task.  Using these interactive apps can also make the lesson fun as well.  Socrative not only has the ability to check for understanding with multiple choice and short answer questions, but the space race game is a fun way to review content.

Seesaw is another app that can keep your students involved in your class.  Use the blog feature in Seesaw to help create an authentic audience for your students.  Knowing that other students, staff, and parents will be looking at their work will make them less likely to allow themselves to be distracted and stay focused.

The reward comes when a student tells you that they look forward to coming to your class.  It means their mind is open to accept new information, ideas and are ready to learn.  Keep the lessons engaging and you won’t have to worry about classroom management during a lesson again.  

Sunday, January 13, 2019

Unleash Student Creativity With Adobe Spark


With technology, there are more ways than ever for students to demonstrate and share their learning.  Today, students can create everything from their own websites that show off their learning to videos that might explain a concept.  A simple to use, accessible suite of tools that can help students share their learning is Adobe Spark.


Spark works on most devices and runs great in a browser, making it a great tool to use with Chromebooks.  Adobe Spark also has a suite of iOS apps for iPhones and iPads.  Spark Post is available for Android devices as well.

Adobe Spark is incredibly easy to use which makes it very classroom friendly.  There are three components to the Spark suite, Spark Page, Spark Video, and Spark Post.  And each component is free to use!  Each Spark component provides templates to help the user get started.

Spark Page is a web site creator in which students can insert text, images, videos, and links.  Students can use Spark Page to create a reflection blog or create a digital portfolio.  Teachers can use Spark Page to create a class page where they can upload photos and student work.

Spark Video is a video editing tool where students can edit a video by incorporating text, images, and narration to create their own movie.  They can use video to explain a concept such as a math problem.  Students can also use Spark Video to introduce themselves, create a video journal, document a field trip, or create a video book report. 

And lastly, Spark Post is a poster maker/graphic design tool where students can create everything from a poster, a flyer, or anything else they might want to create a graphic for.  They can use Spark Post to create a poster about a story they've read in English class or a graphic that explains the steps in solving an equation in science or math.

Sunday, January 6, 2019

3 Mistakes to Avoid When Using Tech in Class

Tech in your classroom can be a very useful tool.  When implemented correctly, it can allow for differentiation, inclusion, and allow students to express themselves in ways they were never able to before.  When not implemented correctly, it can lead to a loss of class time, frustrated students (as well as teachers), and a lack of learning.


With that said, there are caveats that teachers should be aware of when wanting to use those iPads or Chromebooks in their class. 
From experience as a technology coach, I've identified three mistakes some teachers make in their classroom with technology.  So, when you go to use that tech, avoid the following:

1. Not testing it out. Just because it works at home, doesn't necessarily mean that shiny new app you've learned to use is going to work in your classroom. For example, there may be network issues at your school site that block a particular part of the app that either won't let you sign in or allow students to use the app. Make sure and test the app out at your site. Does it work with your school wi-fi network? If you have a minute or two at the end of class, ask a student to sign in to the app to make sure it can be used.

2. Taking for granted that students know how to navigate the web and the computer/iPad. Just because today's students are growing up in the digital age, doesn't necessarily mean they know everything about how to use a Chromebook or iPad. Jumping to that conclusion could lead to frustration by both the student and the teacher. Before using an app or piece of hardware, do a short primer about how to navigate the web or access an app.

3. Using tech for the sake of using tech. I get it. You're excited about using tech in your class. You've heard of this new app or a way to use the Chromebook in your class and you want to dive in, head first. But wait! Don't wrap your objective around your tech. Wrap your tech around your objective. You need to know where you want to go before choosing the appropriate tool. Avoid putting the Chromebooks first. Once you know the objective, ask yourself how tech can help you get there.

Thursday, January 3, 2019

Start a New Semester With These Digital Tools!


With the advent of a new semester, students are apt to be, how shall we say, a bit squirmy.  Trying to harness their attention, no matter what the grade, can be a challenge. 


What better way to start the new year off right with the right tech tools!  The right tools will help keep your students engaged on their first day back from their winter break!
Check out a few tools and how you might use them during the first few days back from a break:

Kahoot:  Kahoot is great to review content!  Perhaps a Kahoot that reviewed the previous semester's information so as to build upon what the student is going to learn this semester.  Or, use Kahoot to find out what students know about upcoming topics by putting together a Kahoot.

Padlet: Invite inquiry with Padlet! Tell the students what they'll be studying this semester and ask them what questions they might have about the topic.  Use Padlet to have students share what they already know about the topic.

Voicethread:  Create a Voicethread using it in much the same fashion as you would a Padlet or Kahoot.  Sometimes, it's just easier for students to speak what's on their minds rather than type it out.  And often, you'll get more out your students if you ask them to record their voice addressing the topic rather than write it.  Ask students what they already know about a topic or ask them what they hope to learn this semester.  Instead of writing a response, students orally share their response.

Nearpod: Find out what your students already know about upcoming topics, what they want to know, or review content from the previous semester.  Nearpod is sure to keep your students engaged through its drawing activities, open-ended questions, and multiple choice questions.  Nearpod also provides its own Nearpod store, where you can browse through a multitude of already made lessons.

EdPuzzle: Create a video of yourself in which you review content from the previous semester, inserting questions for your students to answer as you go.  Then, have students watch the video and answer the questions.  Or, create curiosity by showing a video of upcoming topics, while creating questions asking what topics they're most curious about.

Flipgrid:  If you have the same students this semester as last, ask them to create a Flipgrid where they reflect on their learnings from last semester.  Then, once they've done that, ask them to comment on each other's reflections.  If it's a brand new class, ask them to record their wondering or what they hope to learn this semester.

Monday, December 31, 2018

Apps for Classroom Backchannels


What is a backchannel? A backchannel is essentially a classroom conversation that takes place alongside a class. With the advent of technology in the classroom, backchannels can now take place digitally, in or out of the classroom.

How can a backchannel be used in the classroom?

Opening up a backchannel in your class can serve numerous purposes. It can allow quieter students to fully participate in class. By setting up a digital backchannel using one of the below apps, quieter students can simply log in and share their question or comment. It can supplement your teaching by allowing for discussions outside of the classroom. Students and teachers can participate in a supplemental dialogue about the subject after class is over.

Apps that can be used for a class digital backchannel include:

Backchannel Chat: An app and a website, Backchannel Chat gives the teacher control about what is discussed in the backchannel. Discussions can be archived and available for future reference. Another great aspect of this app is that every post in the backchannel can be moderated by the teacher and must be approved before posted for all to see. Along with the website, there’s an app for Android and iOS.

Padlet: Create a wall that pertains to a specific topic or chapter and use it as a backchannel. Allow students to comment and ask questions on the board. Make sure and turn on the profanity filter.

PollEverywhere: In the same way you opened a Padlet wall, start a discussion in PollEverywhere. Use the app or the website to let students communicate with you. Use PollEverywhere while students are working on a project or classwork. Great for students that are timid in the classroom.

Google Slides Q & A: If you use Google Slides to do a presentation, you’ve got to use Google Slides Q&A as a backchannel. Simply go to your audience tools and start a new Q&A. During the presentation, a URL is presented at the top of the presentation, directing students where to go to ask a question or make a comment. Students can vote on which questions or comments are the best then, at the end of the presentation, the teacher can choose to display the comments while they address them.

Verso: Verso is unique in that when you post an activity to discuss, it allows you to post a recording of yourself giving directions, a document from your Google Drive, or attach a link for students to access. Verso provides an option that allows the teacher, to include certain vocabulary. The other thing that’s unique about Verso is that, as the teacher, you can access classroom stats, showing who has participated in your discussions and how often. Verso is available on the web at Verso app.com as well as an app
.
Slack: Slack is not only great for business teams, but it can be used in classrooms as well. Set up channels for different class topics. Use separate channels for comments and questions. As the teacher, send out discussion topics and ask students to comment. Send students feedback on their work in class.

Three Ways Students Can Annotate PDF's With Their Chromebooks


Paper is out and technology is in! The days of making copies for your classes are over! Why waste time at the copy machine when you can simply upload a PDF to your learning management system such as Google Classroom? Below are three Chrome apps that students can use to annotate the paperwork you would otherwise pass out to them in class. All of the apps below are available in the Chrome Web Store.


XODO: XODO greets you with a straightforward interface prompting you to open a local file (from your Chromebook), a file from your Google Drive, or a file from Dropbox. After annotating the documents, they simply download the file and then upload it to the desired Google Classroom assignment.

DocHub: Simply click “New” from the DocHub dashboard and upload a file from your Chromebook, Google Drive, or Dropbox. Download the document the device, then upload the annotated document to the Google Classroom assignment.

Kami: Clicking on the Kami icon presents the student with a straightforward interface with the options to upload from various options. Kami also provides the ability to create a new blank pdf page on which the student can draw or write. Students can download the document to their Google Drive or to their device. When downloading, Kami provides the option of downloading just the text box annotations, which is good for test taking when the teacher doesn’t need a copy of the questions — just the answers.

Sunday, December 30, 2018

Three Digital Whiteboards that are Classroom Ready

A digital whiteboard is essentially a blank piece of paper. For teachers, it can be a fantastic way to flip a classroom. Teachers can use the digital whiteboard to explain a concept, then, when students return to class, they can ask questions or practice what they’ve learned.
 Students can use the digital whiteboard to demonstrate their learning, explain a concept, or review for a test. And, with a stylus, digital whiteboards are easy and even fun for students to use.
 Below are three digital whiteboards teachers and students alike can use for their class.


1. Explain Everything: Available on all platforms, Explain Everything. Like the other whiteboard apps, Explain Everything allows the student to record their voice while putting together their whiteboard project. Students can share their project via a link that can be copied and pasted on a learning management system such as Google Classroom for review.

2. ShowMe: Like Explain Everything, ShowMe is available for Chromebooks via a ChromeOS app. The project can easily be shared via a link. Along with using their stylus, ShowMe allows for the insertion of a text box, in which the student can type in text. And, like other whiteboard’s, a link to the project can be copied where it can be easily shared with the teachers via a learning management system such as Schoology or Google Classroom.

3. Educreations: Create various classes within Educreations and add lessons to that class. Students can join your class with the class code assigned to that class. Students can use Educreations in much the same manner. They can create classes based on the classes their enrolled in, then, share their project with a link.

Podcasting in the Classroom


With more and more students having access to Chromebooks or iPads, there are new ways students can achieve their learning objectives, one of those being podcasting.

Back in the day, podcasting would have required a portable tape recorder and a blank cassette. Students could talk into the microphone on the recorder all the while making sure they pressed play/record on the machine. Each group would have to use their own audio cassette or share one among the class, hoping they didn't record over other groups work.


Today, podcasting has gone digital. It's a great tool to use for formative assessment and collaborative work. Simply pair students up or have them work in larger groups to create a podcast.

Why podcast? Along with serving as a tool for formative assessments, podcasts can address many listening and speaking standards. A few ways to integrate podcasts into the classroom include:

Reflections: Students can reflect on their learning by speaking what they've learned. And then listen later as a way to review their learning.
Language Practice: Podcasting can be a fantastic tool for language classes. Students can practice speaking a new language, listening to themselves improve in their skills. Teachers can also model the language and have students playback and respond to the teacher in a podcast.
Exit Ticket: Students can respond to an end of day question by speaking their answer and recording it for the teacher or class to listen to.
Interviews: Students can interview each other in a couple of different ways. First, one can pretend to be a historical figure, author, etc. Second, interviews can serve as class introductions. Each student sharing their likes, dislikes, favorite foods and whatever else they can think of.
Explain a Concept: Great for math and science. Students can record themselves explaining the steps on how to solve a math problem or science concept.

Now that we know what podcasting can be used for, we need to find a podcasting tool that students can use. Three apps that are easy to use and classroom-friendly include:

Voicethread: Available for both the Chromebook and iPad, Voicethread allows for the creation of a thread topic, where students can respond. A great way for an exit ticket question posed by the teacher.
GarageBand: The only one of these that's iPad exclusive. Garageband is not only great for creating music but serves as a podcast studio as well, allowing students to record their voice only.
Synth: Synth is also available for the Chromebook and iPad. With Synth, teachers create a podcast classroom where they give the students the code to join. Students can post in the Synth class or respond to a teachers question.

Sunday, December 23, 2018

Real-Life Digital Tools for the Classroom

There’s nothing wrong with using Google Classroom. As a matter of fact, many of the articles I’ve written tie into using Google Classroom. It’s a great digital tool to distribute and collect class work. But, in addition to using Google Classroom or any other learning management system in your class, it’s important to integrate "real-life" digital tools into your classroom.
Google Classroom and other Google tools such as Docs and Slides are perfectly adequate for the classroom. Google tools are good. But, if we want to prepare students for life after school, whether it’s after K-12 or after college, they need to be familiar with the tools they may encounter in the workplace.  Let’s face it, students are more likely to use Evernote, Trello, or Dropbox in the workplace than they are Google Classroom.
I’ve written before about how some of these tools can be used in the classroom. If we want well prepared lifelong digital learners who are ready for life after school, teachers need to expose students to those digital tools they may encounter in the workplace, which I call "real-life" tools. Below are a few of those tools students may encounter in the workplace followed with an idea on how to implement them in class.
Trello: Student can use when working in groups.  They can keep track of team responsibilities.  They can also use Trello as a to-do list.
Skype: Assign students to work in pairs, but with a student from another class!  Ask students to connect with students in other classes and have them work collaboratively via Skype.
Any.do: Have student create and keep to-do lists using Any.do.
Evernote: Ask students to keep their notes in Evernote.  They can share their notes with each other and work collaboratively on an assignment or share their notes with the teacher.
Slack: Students can use Slack when working collaboratively.  They can communicate and share work with each other.  
Explain Everything: Have students explain concepts using this digital whiteboard.  
Dropbox: Students can use Dropbox to store a portfolio of their work, then share their Dropbox with their teacher.
Twitter: Teachers can use Twitter as a means of keeping students informed of classroom activities.
Google Calendar: Have students keep a Google Calendar in which they’ll note upcoming due dates and class events.

Thursday, July 26, 2018

8 Apps For Class Warm Ups


Class warm-ups are an important part of the class. The teacher can use them as a review of the previous days material or they can provide an inquisitive foundation for the days learning. Below are five apps that can get the days class off to a good start.

Recap: With Recap, the teacher can initiate a chat-style discussion. In addition to the typed chat response, one of the cool things about Recap is that it gives the teacher the flexibility to let the students respond to a class warm-up with a video response.
Socrative: A great app for multiple choice quizzes. Socrative allows for the creation of a short answer warm-up question as well. If you feel a little competition would be fun, you can create a digital race where students answer questions faster than the competition to reach the finish line.

Seesaw: A fantastic online digital journal. Seesaw provides the flexibility for the teacher to either post a video, a drawing, a link, or something from Google Drive to the students journal for them to write about.

Google Sheets: That's right, you can use Google Sheets for class warm-ups! Simple create different sheets for different opening topics. When students enter the class, they open their shared Google Sheet, choose a square, and address the topic.

Newsela: Not just for English or Social Studies. Newsela is a great way to increase literacy. Choose from a variety of subjects. Ask students to read the content and answer the questions.

Kahoot: Gamify the opening of your class. Have your Kahoot waiting as students enter the room. A great way to get students seated with their device ready to begin the day.

Padlet: Create a Padlet board to open the class. Ask students to address the topic with links, photos, or video to make the discussion more interesting

Tag Journal: Tag Journal is the only app in the list that's for iOS only. What makes Tag Journal cool is that it allows the students to tag topics. For example, if the class is studying World War II, the journal topics may have something to do with the subject matter. Students can add pictures or audio to their journal entries.

Thursday, July 12, 2018

10 Great Review Apps for the Classroom


Want your class to review before a test? Facilitate a test review with these apps:

Kahoot: Gamify your review with Kahoot! Students log in and compete against each other in choosing the correct answer to review questions.
Nearpod: Make your review interactive with Nearpod! Nearpod is a fantastic interactive presentation app where the teacher can lead the class through an interactive presentation or let the students go it alone at their own pace.
Socrative: Turn your class review into a space race! The first person or team to answer the review questions correctly is the winner!
Quizlet Live: Review while fostering student collaboration. Students are assigned teams in which they try and answer review questions before the other teams.
Pear Deck: Keep your students engaged with this great interactive presentation app. Students can work at their own pace or can be teacher led. Pear Deck slides feature draggable answers, multiple choice, or drawing.
Flipgrid: Ask students to explain concepts using Flipgrid. Then, ask other students to comment on or add to what other students have said.
Recap: Use Recap to pose review questions and facilitate a chat. Students can respond with either a typed chat response or a video response.
Plickers: Get instant feedback without student devices! Print out the cards and distribute to the students. Students simply hold up the card representing the correct answer, then the teacher uses their phone to read the cards, getting instant feedback.
Poll Everywhere: Use Poll Everywhere to either ask your students open-ended review questions or multiple choice questions review questions. Instantly see where your class stands for the test.
EdPuzzle: Use EdPuzzle to create a teacher review video. Then, insert questions in the video at key points. Students work at their own pace to complete the video review.

Great Apps for Assessment

With Chromebooks and iPads becoming more commonplace in the classroom, teachers are often looking for ways they can use the technology to assess their students. Below are a few recommendations.


Socrative: Use Socrative to give a multiple choice or true/false test. One of the great things about Socrative is that you can view your students progress as they take the test. Students can instantly get their results upon completion of the test. Upon giving the test, the teacher also has the option to let the students go through the test at their own pace or it can be teacher directed, going through each question one by one with the students. Test result reports can be printed or saved to your Google Drive. Socrative also has a student app for phones and tablets that makes it even easier to take the assessment.
Nearpod: The fantastic interactive presentation app, Nearpod, has a quiz element to it. Embed a quiz at the end of a presentation where the students have just reviewed the information. Nearpod makes it possible to add reference material to each question, such as a website, a picture, or a video. For example, include a map in a question and ask the students the relevance of the map. Include a drawing slide and ask the students to draw a flag or trade route. For math, ask them to solve an equation. Include an open-ended slide where the students address an essay question.
At the end of the assessment, Nearpod provides a detailed summary of how each student performed on each question type, whether it’s an open-ended question, a drawing question (which could be used for math to solve equations or draw maps), or multiple choice.
Google Forms with Flubaroo: Google forms is a great way to give students a formal assessment. But the power of Google Forms is amplified with the use of the add-on, Flubaroo. If you haven’t used Flubaroo, you owe yourself a try, it’s easy to use. Simply link your Google Form assessment to a Google Sheet. Install the Flubaroo add-on, and you’re ready to go! Take your assessment and set your answers as the answer key, so when Flubaroo grades the tests, it will grade them against your key. Once the test is graded, Flubaroo shines with the data it presents. If a majority of students got a question wrong, Flubaroo will identify that question by color coding it. And, students who scored low on the assessment will be color-coded as well on the spreadsheet — pretty cool. You can view a report showing the grade distribution as well. And lastly, the teacher can email a copy of the grade report to the student, identifying which questions the student did well on and which ones they didn’t.

Educreations: Educreations is a handy whiteboard app where students can record themselves explaining a concept. So, how can it be used for assessment you ask? Well, Educreations shines in the math classroom by asking students to explain how to solve math problems. Why not use it for assessment? Give your students problems to solve, then, ask them to work each problem out on a separate page in Educreations. When they’re done, they can copy the link of the assessment and paste it into their classrooms learning management systems such as Google Classroom, Edmodo, or Showbie for their instructor to view.

Tuesday, July 3, 2018

Pinterest in the Classroom

Pinterest is a great resource for, well, everything. Pinterest is a good place to start if you're looking for inspiration or fresh ideas. Pinterest is also easily adaptable for classroom use, and, chances are, your students already know how to use it.
  1. Student introductions. A great way to have students introduce themselves is through the creation of their own Pinterest board. Ask students to tell the class about themselves through the use of pictures. Have them include in their board their favorite foods, likes, dislikes, favorite places, interests etc.
  2. Student collaboration. If students are collaborating on a project, have student groups create a board where they save information on their topic. The board would be a great place to serve as an information repository.
  3. Distribute assignments. Create a class or subject board to distribute assignments, such as reading and worksheets.
  4. Research. Students create boards as a place to store their research.
  5. Share what’s happening in class. The teacher displays pictures of student work and projects. Include photos of assignments and other goings on in the classroom.
  6. Post assignments. Create a board and use it as an assignment repository. Include worksheets, classroom and homework assignments, as well as instructions for assignments.
  7. Students visual report. Have students create a board in which they create a visual report. Students include pictures on a topic and explain the significance of each picture as it pertains to the topic.
  8. Comment board. Students post their work for other students to comment on.
  9. Assignment repository. Teachers create a board for each unit/chapter in the class. Include all relevant information pertaining to the unit or chapter.
  10. Parent communication. Teachers stay in touch with parents. Create an upcoming tests/assignments/events board
  11. Celebrate students.  Celebrate those who do well with an achievement board. Post exemplary student work and test scores.
  12. Brainstorm.  Create a brainstorming board. Students upload images where all students can review the board for ideas.
  13. Presentation board. Students create a presentation board with images only.
  14. Share resources. Create a board that includes class notes and readings that will help students with class work.
  15. Samples of student work. Create an example board. Sometimes students need examples of past work and projects. If students need examples, point them to the board.
  16. Bellringer prompts. Create a board for bellringer prompts.