The EdTech Coach Podcast

Monday, September 5, 2016

Show Your Students the World with Google Tour Builder


Google Tour Builder allows you to take your class on a tour of the world. 

Tour Builder is a great new way to take your class on an adventure.  It can be used in place of the traditional slide show app. Google Tour Builder uses the power of Google Earth, so if you're familiar with Google Earth, you know how useful Google Tour Builder can be.  Tour Builder lets you pick the locations right on the map, add in photos, text, and video, and then share your creation with your class.

Tour Builder can be especially useful for social studies and English classes. For example, if your teaching your class about the major battles of World War II, you can take your class on a virtual tour of the battlefields.  If your teaching a novel in English class, you can show relevant locations of the book. 

And, to top it off, Tour Builder is simple to use.  Simply type in a location and Tour Builder will locate it for you. Or, if you prefer, you can drag an icon where you want it in the world. Once you've identified a place on the map, you can add pictures, video, and text explaining the significance of the destination. Once done, you can set another point on the map and do the same thing. Tour Builder will hop from location to location as you progress through your presentation. 
Check it out at Google Tour Builder.


Sunday, August 21, 2016

Rough Draft: A Mac and iOS Writing Tool for the Classroom


Rough Draft is a writers tool that educators using iPads may want to consider.  Rough Draft is a text editor that's been available for the Mac and has recently become available on iOS.  It's the app that constantly reminds you that you are working on, as the name implies, a rough draft. How does it do this? Well, when working in Rough Draft, there is no delete option, only the ability to strikethrough. By doing so, you are constantly reminded that what you're working on is only a draft.
How does this help someone write? By having the ability to see the strikethroughs on the page, you are more likely to continue your work without pausing to figure out just the right line, phrase, or word to include in your document. You can do that later. Right now, the important thing is to your get your thoughts out of your head into the computer. This, in essence, sets the writer free and enables them to be less careful and more carefree when writing their document. All too often we edit while writing, ultimately taking way too long to get our ideas out. The point is, you want to stay in the flow and not pause. The makers of Rough Draft, 96 Problems, say that when you type a document on a computer, you are given the impression that its permanent, so you spend time perfecting your document while you write. Before you know it, that 500 word document you sat down to write has taken you hours. Rough Draft eliminates that.
Rough Draft also provides you with the ability to insert a placeholder in your text. Let's say you want to insert a picture or quote into your document but aren't quite sure which picture you want or what the perfect quote will be, you just know you want one in there. Rough Draft inserts a placeholder where you want to place the item so that you can come back to it later, when you're in the editing process. This is most certainly a timesaver. No longer are you pausing your writing to search for that quote or picture, you continue to write. And that's the purpose of Rough Draft, to keep you writing.
When you're ready to edit, you simply click "revise" and the strikethroughs are removed while the placeholders are kept in place. Your document appears as clean as can be. If you prefer to use yourfavorite text editor to do the editing and publishing, Rough Draft allows you to export your work.
When all you want to do is wrtie, Rough Draft is a good tool to not only have in your writers tool box, but in the classroom as well.

Tuesday, July 26, 2016

Training for Google Apps is Just a Click Away.


If you haven't heard, Google has made a new extension available called Training for Google Apps.  If you're new to Google Apps or just want to know more about them, you MUST install this extension.

One of the many cool things about the extension is that it's app specific.  By app specific, I mean that if you're in Google Slides, clicking on the training icon in the upper right will present you with a plethora of training videos about Google Slides.  For example, if you're putting together a Slides presentation and want to insert a video but aren't sure how to, simply click on the Training for Google icon and scroll to the video.

And, as the name implies, training is not only available for Google Slides, Docs, and Sheets, but it's also available for other Google Apps such as Google+ and Google Calendar.

I can really see the value for not only teachers but students as well.  Now, there's little excuse for a student not knowing how to insert a chart or copy a slide in Google Slides or how to rename or copy a Google Doc.

I couldn't recommend installing this extension enough.  If you use Google Apps, installing is a no brainer.

Saturday, July 23, 2016

Google Brings Art and Culture to the Classroom


Google recently re-launched their Arts and Culture app and website, and it's great! Not only are the app and site great for exploring the world of art, but they also allow you to take virtual tours of museums, historical sites, and famous cultural sites around the world.

History is also well represented.  Clicking on the historical events tab will present you with countless events in history.  Each event provides a cornucopia of pictures, artwork, letters, and historical sites.

Whether you're teaching art or world history, Google's Art and Culture app and site will take your students on a great field trip.  Works of art are separated according to the artist, art movement, color, and medium used.

For example, after clicking on Vincent van Gogh, you'll be shown a brief biography followed by his artwork.  You can organize his work by timeline or by color.  Click on a particular shade and you're presented with his work that closely matches the shade.

One of the killer features of Google Arts and Culture is the ability to use it with Google Cardboard.  You can take a virtual reality tour of over 20 locations around the world, such as the Temple of Zeus.

The site and/or app is a must for those that teach art, world cultures, or history.  The app is available for both Android and iOS.  More information about Art and Culture can be found on Google's blog.

Sunday, July 17, 2016

Start Your School Year Off With This Tech


For some, it's way too early to talk about the beginning of the next school year. For others, the next school year is just around the corner.  I know that some teachers have the same routine year in and year out for the first couple days of school.  But, with technology slowly creeping more and more into the classroom, I thought I'd offer a few ways to change it up a bit and set the tone of the school year with some tech.

1. Peardeck:  I've touted Peardeck as a great way to engage your classroom.  Start the year off using Peardeck to have your students introduce themselves to you and their classmates.  Students can use Peardeck to either draw or write about themselves, all the while having it displayed on the projection screen.  You can also pose various questions to students about their likes and dislikes, showing the results on the big screen in front of the class.

2. There are a couple of ways you can use Google Slides.  First, have students create a Slides presentation about themselves, which they can share with the rest of the class.

3. The second way to infuse Google Slides into the first day of school is to use Google Slides Q & A.  Pose different questions about likes and dislikes, as well as finding what their interests are.  You can even prepare a pre-test to get an idea what the kids know or don't know about the subject.  Ask students to pose questions about the class itself as far as rules and procedures go.

4. Introduce the students to the world of blogging.  Use Kidblog to have the students blog about themselves.  They then share it with their classmates.  Have the readers pose questions to their classmates in the comments section.

5. In much the same way students use Peardeck, you can use Google Drawings.  Have students create illustrations about themselves.  They can search the internet to find pictures that represent who they are.

So there you go, just a few ways to introduce your students to the tech you may be using during the year.  Feel free to share how you use tech in the classroom on the first day of school.

Thursday, June 23, 2016

Deckset: Presentation software for those on the go.


Deckset is presentation software, simplified. It’s easy to use and can be a very handy tool should you have to produce a presentation in a pinch. Deckset, brought to you by the folks at Unsigned Integer, can take your notes and/or simple text that you’ve put into your favorite markdown text editor and translate them into an attractive presentation. It’s essentially a minimalist text editor for presentations. To effectively use Deckset, you should be familiar with markdown formatting.

Where Deckset really shines is in how it saves you time. You won’t have to spend a lot of effort putting slides together as you might with more elaborate software such as Keynote or Powerpoint. And, as the description of the software states, it not meant to replace either of those powerful programs.

It comes with many handy themes and the ability to change them on the fly as your taste suites you. If you find yourself pressed for time or simply want to add a brief slideshow to accompany a presentation, type a few handy terms or sentences into your favorite text editor, open Deckset, and you will be prompted for a markdown text file to translate into a new presentation. Choose the appropriate text file and there you have it, a presentation is created with little or no effort.

Many times, we spend too much time adding pictures, editing transitions, and manipulating the text in our presentations. Deckset allows us to focus on what we want to say and not spend all of our time focused on designing the slides.
To learn more about Deckset, it can be found in the Mac App Store or at the Deckset web site http://www.decksetapp.com.

Monday, June 20, 2016

Create Fun Study Guides with iBooks Author!


When iBooks Author for the Mac was first introduced, it was seen as fairly revolutionary. One could easily create their own textbooks and, furthermore, publish them in the iBooks store for all to read. The authoring Mac app makes it easy to not only publish your own textbook or novel (or short story for that matter), but it’s a great way to create interactive study guides for your students.

Provided your class has access to iBooks, iBooks Author provides the teacher with a fun way for students to not only learn new content, but review content as well. Most of today’s students are familiar with technology and have grown up with it. They’ve become accustomed to interacting with content, rather than just looking at something on a page. iBooks Author allows students to interact with slideshows, videos, and 3-D content like never before.

As a study guide, the books you create in iBooks Author allow the students to take notes right in the textbook. They simply swipe the content they want to add to their notes. Then, after their not taking session, they can change to note view to view all of the notes they’ve taken. Furthermore, the notes the students take appear on study cards, where they can add such things as definitions to vocabulary words to the back of the card.

Upon starting iBooks Author, you are presented with numerous templates for which to begin putting your book together. Choose the template that best fits what you want to do and your off! If you can drag and drop, you already know how to use iBooks Author. You can drag Pages or Word documents into your book, add Keynote presentations, or even add a short movie to help get your point across.

iBooks Author is a great way for students to interact with content. As a teacher, you can imbed your notes and presentations. iBooks Author is a tool that teachers can use to either provide study guides or provide a powerful, interactive supplement to their textbook.

Friday, June 17, 2016

Got the summer school blues? Use these online tools to brighten your day!


Summer high school teachers, we've all been there.  You have one class with the same students and the same subject for the entire day.  The day is dragging. Lecturing for hours is out of the question.  Having the students do book work for hours upon hours can be pretty boring and really make your day drag. But now there's The Internet and GAFE!  Make the day zip by while having your students learn the subject matter using online apps.

You say you don't have access to computers or a computer lab, well, there are ways around that, especially at the high school level.  Knowing that most of your students have cell phones will set you free of a day of classroom monotony. And, even if not all of the students have phones, they can still partner up with those that do.
Here's some ideas:

Socrative is a great way to spend a summer class session. Split the class up into teams using just a few cell phones and boom! You've got fun learning that can last as long as you need it or want it to.

Quizizz is another great way to keep the troops entertained while there is actual learning going on. Again, split the class into groups based on cell phone availability and review the days topic with your students. You can creamy a quiz beforehand or quickly use one that has already been created.

Pear Deck is a good activity to use when other reviewing content or going through it for the first time. Split the students into pairs and pose different questions to each group and have the students take notes on their classmates answers. Assign different parts of a text to different pairs and have them present the main points through Pear Deck on the big screen for all to see.

Google Slides Q & A could also work with pairs.  Have the students pair up and ask them to come up with questions or comments about the Google Slide presentation that you've given.  Students enjoy seeing their questions and comments on the big screen in front of the class.


Saturday, June 11, 2016

A GAFE Summit can Reinvigorate your Teaching!


A few months ago I was lucky enough to have the opportunity to attend a GAFE Summit in Southern California and I jumped at the chance.  I gotta tell ya', it was awesome!  If the opportunity should present itself, don't miss it!

The GAFE Summit worked for me on two levels.  It not only provided me with a wealth of information about Google Apps for Education, but it also reinvigorated my teaching.  I was excited to try out many of the new things I had learned at the summit so, believe it or not, I couldn't wait to see my students again!

For those of you who've attended a summit, you know exactly what I'm talking about.  Those of you who haven't been to a summit but are been curious about them, let me tell you, a GAFE Summit will do two things for you.  It will provide you with an excellent set of tools to take back to your classroom and, it will re-energize your teaching.

After an entertaining and informative keynote, you are presented with different breakout sessions at which you can attend.  Want to brush up on using Google Forms? There's a session for that!  Want to explore creative ways to use Google Slides in the classroom? There's a session for that too!  The point being that you attend the session that most suits your interest.  Everything from learning how to use Google Classroom to using Google Photos, there's something for everyone and at every skill level.

As I said before, attending a Google Summit worked for me on two levels.  I spoke about the first, but the second is even more important.  While at the summit you find yourself surrounded by educators that want to learn how they can refine and improve their craft.  It's exciting to be surrounded by other professionals who want to improve their teaching through the use of GAFE tools and who are excited to use them in their classrooms and present them to their schools.

At the conclusion of the summit, I found myself like many other teachers in attendance, you can't wait for the next school day so you can try out many of the new ideas that you've learned!  You really do feel a sense of being invigorated and ready to share what you've learned.

Again, a GAFE Summit will not only give you a slew of new skills, but it will re-energize you teaching!  If you have the opportunity, you gotta' go!

Saturday, June 4, 2016

Playing Games with Quizizz


Quizizz (http://quizizz.com/) is now integrated with Google Classroom!  This is great news as it will make it easier to integrate it into my classroom.  If you don't know, Quizizz is a great platform for reviewing material and assessing your students.  

Quizizz most certainly brings out the competitive spirit in your students as they compete against each other as to who will have the title of Review Champion!  Students enjoy the games as they compete to answer questions that were either created by you or by someone else.  You see, before creating a quiz, you have the option of selecting from numerous other quizzes that were created by others.  Simply type in the topic in the search bar and you are presented countless quizzes.  The cool thing about doing the search is that you are presented with a preview of each quiz on the right-hand side,  so you can look at the contents of a quiz before selecting it.  Searching for World War I provided me with over 4,700 quizzes.  As I said before, if you don't like the quizzes you are shown or if you want something a bit more specific to your subject matter, you can create your own.

Another great aspect of Quizizz is that you are provided with post game reports.  The reports provide the teacher with invaluable data such as the percentage of accuracy for your class, the percentage of correct answers for each question, as well as individual student answers for each question.  And, if you choose, you can either print the report or download as a spreadsheet.

If you're looking for a fun and easy way to review material with your students (and who isn't), you owe it to yourself to try Quizizz.

Monday, May 30, 2016

The Teacher Is In Control With Kidblog


We all know that writing is an integral part of the classroom.  One way to get kids writing is by having them create a blog.  Blogging is not only one way to get the kids writing, but they can also share and comment on each other's ideas.  And, blogging is a paperless writing exercise so no need to collect papers!

One blog platform you could use to get your kids blogging in the classroom is Kidblog (kidblog.org).  Kidblog is a blogging platform tailored for the classroom.  With Kidblog, the teacher is in complete control.  From who can see the posts to who can comment, Kidblog puts the teacher in total control of the blog.

It's easy for your students to join the blog, either by getting a code from the teacher or by going to a specific address.  As I said, the teacher has complete administrative control over student accounts.  Student blogs are private by default with the teacher being the only one that has access.  Blogs must have teacher approval before they can be seen by other students.

Whether you want your students to write about a specific topic or reflect on the day, Kidblog is a great way to engage your students in writing.  I recommend checking it out!

Sunday, May 22, 2016

Differentiate With Doctopus


This is a public service announcement: Doctopus is great!  
Doctopus is a must for the differentiated classroom.  Those of you who know Doctopus, know how powerful it is in differentiating work among your students.  Those of you who are unfamiliar with Doctopus, it is a Google Sheets add-on that brings easy differentiation to your class.

Some classes today are integrated to include both regular education students and special education students.  Obviously, a classroom such as this has students with different abilities.  This is where Doctopus comes in.

 A key to conducting an integrated class is differentiating the work.  In the old “paper” days, you may have had to print different copies of an assignment for different students.  Today, in a paperless classroom, printing worksheets is a thing of the past.  With Doctopus, one need only send work to a student's Google Drive wherein they open it and use it in class.

The instructor simply creates as many differentiated assignments as they need in their Google Drive.  Using Doctopus, you can send the differentiated assignments to the students of your choosing.  Doctopus is a must in an integrated classroom.

The first thing you want to do is add it to Google Sheets by opening a Google Sheet and clicking on the Add-ons tab.  Doctopus is easy to use.  Simply create a roster of students and import them into a Google Sheet.  Using Doctopus,  choose which students get which version of the assignment.  Along with differentiating work for specific students, Doctopus allows you to differentiate among groups as well.  If you're not familiar with Doctopus, you owe it to yourself to check it out.  Like I said earlier, it's a must have in your classroom.  It will make preparing assignments in your differentiated classroom a breeze.


Saturday, May 21, 2016

Give Google Drawings Some Love


Google Drawings is one of those hidden gems that is an essential classroom tool.  We all talk about using Google Docs, Google Slides, and Google Sheets, but what about Google Drawings? Google Drawings can open a wealth of ideas for use in the classroom.

Drawings is not apparent when one clicks the "New" button in Google Drive.  You have to dig a bit deeper to get to it.  After sliding down the tab to "More," it is only then you see Google Drawings.

Drawings is as useful as your imagination and creativity will allow.  And, needless to say, like its Google Drive brothers, it allows the classroom to go paperless--woohoo!  I've used Google Drawings a few different ways this year and am looking forward to exploring new ways I can integrate it into my classroom.

Here are some of the ways to incorporate Google Drawings into your class:

1. Introduce Yourself
Google Drawings can be used as an introduction tool.  I ask the students to tell my about themselves using Drawings.  They copy and paste pictures from the web, draw representations of likes and dislikes, and write about their family and other things using text boxes and shapes.  Google Drawing is a blank canvas that unleashed student creativity using technology and the web.

2. Newspaper
Students create newspapers about certain time periods.  You want your students to summarize a time period?  Assign a newspaper assignment to the class.  Students create a name for their newspaper, headlines, and insert pictures and write articles about the topics of the time period.

3. Timeline
Students can create timelines of events in Drawings.  Grab the lower right-hand corner and drag the canvas to the right to expand it, making more room for the timeline.  Students can not only put dates on their timelines, but they can include colorful text boxes chalk full of information and pictures for each event as well.

4. Poster
I ask students to create posters describing different topics.  For example, they create biography posters about different historical figures.  Students are asked to scour the web for pictures, quotes, and resources to include in their poster.

Sunday, May 8, 2016

Get Interactive with Google Slides Q&A

After hearing about the new Q&A feature in Google Slides and knowing I was going to give a Google Slides presentation the next day, I knew this was a great opportunity to try it out.  I'm happy to report, all went swimmingly well!


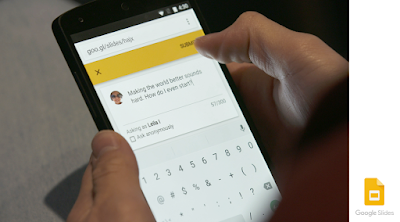
If you haven't heard, the new Q&A feature in Slides enables viewers to ask questions while you're delivering your presentation.  Now before you say, "What's the big deal, why not raise your hand and ask a question?" Well, it's not so much that you can ask a question, but how Q&A enables the participants to do so.  And in a classroom environment, Q&A sets those shy students free to ask questions at their will.

Oftentimes, a participant has a question during a presentation, but the presenter may only take questions at the end, asking them to hold onto their question until the end.  Unfortunately, when the time comes to ask questions, the participant has forgotten what they were going to ask.  Q&A solves this by letting questions be asked as soon as they strike someone's fancy.

To enable the new feature, open your Google Slides presentation and click on the down arrow next to the "Present" button.  From there, click on "Presenter View."  Make sure you're on the Audience Tools" tab and click "Start New."  Above your presentation will appear an address from which your students can ask a question regarding your presentation from their preferred device.  The question can be asked anonymously by clicking a check box.

While presenting, you can see the questions as they're being asked.  Participants also have the ability to choose which questions they like and want answered the most.  So, at the end of your presentation, you can see which questions were more popular and address those first.

In my high school classroom, I found that students are much more actively engaged during a presentation than they otherwise would be, having to really pay attention to ask relevant questions.  And, as I mentioned before, those students that are too shy to raise their hand have been set free to ask questions to their heart's content.

There's another reason why today's high schooler might be more excited about a presentation--they get to use their cell phones!  The glee in their eyes when I asked them to take out their cell phones and go to the listed address to participate could have brightened up a room.  I told each of the students to come up with at least two questions and to vote on at least two others.

The new feature in Slides is great and I know I'll use it often.  Check out this video to see Q&A in action https://youtu.be/nFMFXSvlXZY.


Monday, May 2, 2016

Current Events for the 21st Century

A great way to keep your students informed and help make them a knowledgeable and productive citizen in our society.

As a social studies teacher, I think it's important that my students are kept up-to-date on current events.  In the days prior to internet streaming, I would list a couple of current events on the board and elicit a discussion about those topics.  Or, I would ask the students to bring in current events and share them with the class.  Those arcane ways of staying on top of current events are no longer necessary.  Today, I have the power of the internet!

I use CNN Student News to stream daily current events to my class as my opening activity.  The news stream is designed for students in junior high and high school, so you don't have to worry about fluff or subject matter that may not be appropriate for your students.

Now before you say, "wait a minute, CNN is biased a certain way," I assure you that it's straight reporting with no commentary.  It's presented in simple language that kids will understand.

Each segment is about 8-10 minutes long and usually consists three or four current news stories.  In my case, most of my students looked forward to the news each day.  But, in order to keep the kids more engaged, I'll preview the day's news report and create a few questions that the students will answer as they view the stream.  I have my students keep the questions as part of a weekly news log.  On Friday, after the news, I ask them to pick one of the topics of the week and write their thoughts about their chosen topic.

Again, I can't recommend CNN Student News enough.  It's a great way in today's visual society to keep your students abreast of current events and help make them an informed  citizen in our society.

Friday, April 29, 2016

A Puzzle Maker Worth Owning


Ok, so here's the scenario:
You're getting ready for the day when you realize that you need to fill about 10 or 15 minutes at the end of your class.  What do you do?  Well, I can recommend an iPad app that will help you while having the kids practice their vocabulary.
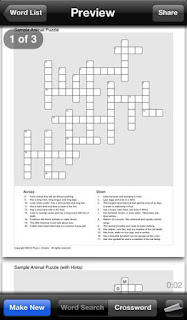
It's called "Make Your Own Puzzles."  It's a crossword and word search puzzle maker for iOS that's quick and easy.  Simply enter the words for a word search and the puzzle maker will fashion a word search to your specifications or...enter the definitions of the words for a quick crossword puzzle, again built to your specifications.
After your puzzle has been created, you have the option of printing out just the puzzle page, a puzzle page with a key, or, in the case of a crossword puzzle, a puzzle page with hints.
"Make My Own Puzzles" can be found on the iOS App Store for $1.99.  If you need a crossword/word search puzzle maker, this is the one to get.
One thing to remember, the app makes puzzles that are intended to be printed out.  It is not intended to make puzzles that are playable in the app.

Thursday, April 21, 2016

Autocrat: Sheets and Docs Playing Together


They say that necessity is the mother of invention. Well, in my case, necessity was the mother of desperation. You see, I recently gave a presentation on Google Classroom to my colleagues. Each of the participants had a Chromebook with which to participate in the session (you'll see why this was a good idea in a second).

At the conclusion of the session, I wanted to send the attendees a certificate of completion but wasn't exactly sure how I could quickly do that. The operative word being "quickly." I didn't want to invest a bunch of time writing their names into each individual document, and then mailing it to each individual, one by one.  Then I remembered "Autocrat."

I had heard of Autocrat some months ago but didn't truly appreciate the power of it until I attended a Google Summit session on Autocrat. I thought, *I could use Autocrat to generate a certificate and email it to the attendees! This is great! I could continue to show the power of Google apps for education long after the session was over!*

To those not familiar with Autocrat, it can best be explained as being a Google Sheets add-on that can take data from a Google Sheet and merge it into a Google Doc.  If you're familiar mail merge, then you get what Autocrat is all about.

At the conclusion of the session, I had asked the attendees to fill out a Google Form on the session (this is where the Chromebooks came in handy). Some of the more important information I could use in order to send the certificates were their names and email addresses. Using that information and Autocrat, I prepared the certificates and wowed my attendees.

One of the cool things was that after telling them how I put together the certificates, many became even more interested in using Google Apps such as Docs and Sheets in their classroom.

If your looking for an easy way to merge information from a Google Sheet into a Google Doc, Autocrat is the way to go!

Saturday, April 9, 2016

Google Slides and Google Classroom: Note-Taking At Your Own Pace.


Most of us have been there. You're lecturing on the topic at hand, using your particular presentation software of choice and a projector. You've thoughtfully put together each slide, detailing what the students need to know, when, after clicking to the next slide, you hear, "wait!" Another student exclaims, "you're going too fast, please slow down!" 

I was reminded of this after reading the article "My kid needs a teacher, not a Chromebook," http://goo.gl/n873yL.  The article discusses the value of taking notes, whether its done in the classroom or whether they're taken out of the textbook. It goes on to say that the introduction of Chromebooks have all but negated note taking in the classroom. I agree with the notion cited in the article that when students write information down, they're more apt to remember it. 

This is where Slides and Google Classroom come in.  Instead of presenting the slides to the students in the classroom as a whole, a teacher can put the notes on Google Classroom.  Students can then write the notes down, at their own pace, on a piece of notebook paper. 

Let's face it, we all write and comprehend information at different speeds. And it can be frustrating for not only a teacher, but for some students as well, when a few students slow the class down because it takes them a few more moments to write down the notes. And, coupled with Google Forms, you have yourself a great little note-taking exercise. 


By marrying Google Classroom with traditional note taking, a teacher can have the best of both worlds. The students are taking notes in a traditional way, writing them down on a piece of notebook paper, and at their own individual pace. The teacher can take the note-taking one step further with Google Forms.  After taking down the notes, the students can complete an assessment of the notes using Google Forms. The students will use their notes to answer the questions in the form. 

So there you have it! Technology and traditional note-taking, old school and new school if you will, living in harmony.

Wednesday, April 6, 2016

The Chromebase is a Good Option for Schools

Chromebase computers are a good option for educational institutions. No, that's not a typo. I did say "Chromebase," not "Chromebook." 

Thursday, March 31, 2016

The Dark Side of Tech in Education: Caveats For Introducing Tech In Your School or Classroom.


It's true that technology in the classroom can be a helpful thing. There are numerous reasons to use it in the classroom. And, when used properly and to its fullest potential, tech in the classroom can be a downright exciting and fun experience. But, there can be a dark side to tech in the classroom. 

In an effort to improve education, many school districts have turned to technology as a solution. Technology is thrown into classrooms while the school administrators sit back and wait for the high test scores to roll in. But unfortunately, this isn’t always the case. Sure, there are a couple of obvious things that most are aware of when implementing tech, like the cost and maintenance of the technology. But, there are a few more specific things to be aware of before implementing tech into your classroom.

1. Students may not be interested in activities that don’t use technology.

After being exposed to exercises using technology, namely computers, students may be hard to motivate in terms of doing the same work without technology. For example, students write an essay using a Chromebook. The entire process is done on the laptop, from draft, to editing, to final draft, everything is completed on the computer. They even turn it in by emailing it to the teacher or through such classroom management applications like Google Classroom. The following week the students are asked to write an essay, but this time, without the Chromebook (for whatever reason, the computers are not available that week). The first question out of their mouths is “why can't we do the assignment on the computer?" They'll be hard to motivate to complete the assignment without the technology for the simple fact that they much prefer to use the computer than doing it the old fashioned way.

2. Teachers in-service training is generally needed when introducing new technology--another workshop or staff development they don’t have time for.

Teaching is much like many professions in that you may have people that have been in the teaching profession for a long time. Herein lies the problem. Technology wasn't as advanced 20 or 30 years ago as it is today. Therefore, there are teachers who have been teaching the content in much the same way for the last 30 years and its worked fine for them. 


Getting veteran teachers to try a new teaching method, let alone something they have to take time and learn, can be something of a chore. And, as teachers know, it means training. Introducing technology into a school requires that teachers are shown how to use it, otherwise there isn't much point. That means taking time from teachers that they really don't have.


Teachers spend six or seven hours in a classroom but as most teachers know, a lot of their teaching time is dedicated to preparation. After all, someone has to put together those Powerpoints and worksheets as well as enter student work into their grade book. Attending training on something entirely new will take them away from their necessary tasks.

3. Technology could prove to be a distraction for students. 
Instead of using their phones for research, students are tempted to text each other or use social media.

It seems silly to have these powerful computers in their pockets and not be able to conduct research on a project that they’re working on in class. But, although they are powerful research tools, the smart phones can prove to be a distraction. Sure, the student might access needed information for an assignment. But, once they've completed the research, oh what a tempting device their phone is. The phone is on, it's in their hands staring back at them, why not check email or send a quick text? And, they can't stop at just one text because they’ll get a return text, and they most certainly have to reply. Or, perhaps they have to reply to that email they just received. And that new game they’ve downloaded, it hasn’t even played yet, what could it hurt to open it and check it out. Before you know it, the student is spending more time on their phone for recreational purposes than on the research as was originally intended.

4. Teachers use it because “they” like using it, with little concern for the students.

This one is a call for teachers to police themselves. So here's the scenario: A teacher has bought a shiny new laptop over the weekend with some brand new presentation software. Loving their new computer, the teacher spends all weekend putting together new presentations because they love their new computer and software. Come Monday, the teacher shows off the new computer by giving a presentation of the material at hand. On the surface, this is not such a terrible thing. But now, we're in week 2 of the new presentations with the new computer, then week 3. The teacher can fall into the trap of loving to use his technology so much that he neglects the students. Sure, he's giving them the material. But, as teachers know, he has to change up his lesson planning a little bit.

So, before implementing technology in your classroom or introducing it to your teachers as an administrator, be aware that there are caveats. If used properly, tech in education can fabulous tool for learning.

Tuesday, March 29, 2016

Edpuzzle: Videos At Your Own Speed


The days of printing out a worksheet for the students to complete while watching a video are over. Edpuzzle is interacitve video viewing at its best.


Whether its a trip to the computer lab or if you're lucky enough for each of your students to have access to a computer in the classroom, you must implement Edpuzzle into your classroom.
Edpuzzle is a video service that allows a teacher to insert questions for a student to answer while watching a video. Be forewarned, on the day the students are assigned a video, make sure they have headphones or earbuds, otherwise, you'll get the sounds of the video playing at various times--it can sound chaotic.

While the students watch the video, the teacher can monitor their progress. After the students have completed the video, the teacher can go back and review each students answers for later discussion.
Edpuzzle works well with Google Classroom. Edpuzzle provides you with the option to upload your Google Classroom rosters. And, when you make assignments in Edpuzzle, you're asked if you would like to make it an assignment in Google Classroom as well. Once you've created your classes, you can use Edpuzzle to search for a particular video based on your topic from various resources such as YouTube, Khan Academy, and Crash Course (to name a few).

After choosing a particular video, you can insert your own questions at various points where you want students to focus. During the video, the questions pop up at your prescribed point while the video pauses. Once the student answers it, the video continues. If a student doesn't remember the answer to a question, they can simply replay that segment until they get the answer.
Edpuzzle is a great way to individualize the viewing of a classroom video. It keeps the students engaged while constantly checking for understanding. Edpuzzle is another tool every teacher should have in their toolbox.

Friday, March 25, 2016

Pear Deck: Interactive Goodness


Pear Deck is interactive goodness that every teacher with access to technology should have in their teaching arsenal.


I was introduced to Pear Deck recently at a Google Summit. Those of you not familiar with what a Google Summit is all about, it's essentially a geek fest for educators. It showcases various ways to expand your teaching through the use of Google for Education services or other online tools that help promote student learning. One of the sessions I attended was on an online service called Pear Deck.

I like to think of Pear Deck as PowerPoint on steroids. Pear Deck is online presentation software where you don't really need a projector or screen to share your Pear Deck with your students. You see, Pear Deck is interactive. Students don't simply sit there and stare at a presentation jotting down a few notes. No, quit the contrary, students are busy interacting with the deck, answering essay questions, choosing multiple choice answers, drawing, and labeling things in the presentation.

Gone are the days where a teacher tries to make the material interesting by spending hours creating flashy presentations, hoping to keep the students attention while relaying the course content. Instead, students are using devices such as Chromebooks, a PC, a tablet, or even a phone to participate in the presentation. Also, participation is no longer dominated by those few students that are constantly raising their hands while the timid few are afraid to answer a question. And when you do call on those that rarely raise their hands, the "I don't know" answer won't work.

Pear Deck demands participation by reviewing student answers anonymously. That's right! When reviewing student answers, it's done anonymously, erasing the fear that some students have by giving the wrong answer. Students want to participate if, for no other reason, they want to see their answer projected on the screen for all to see. Oftentimes, when I was using Pear Deck, I could hear students say "that's my drawing" or "that's my answer!"

If you so choose, you can project the deck on a screen, reviewing student answers with each question. Students particularly get a kick out of the questions that ask them to draw something. Showing their work on the screen along with their classmates will usually elicit a giggle not only from the students, but from the teacher as well.

Pear Deck also excels in that it works nicely with Google Drive, so all of your student decks are saved where you have easy access to them. At the end of the session, you can send each student a copy of their deck, called takeaways. A takeaway is not only a copy of the deck, but a copy of the answers the student provided. It serves as a great way to provide a study guide for an upcoming quiz. Speaking of quiz, you can take Pear Deck to the next level by coupling it with Flubaroo. Use Pear Deck as a quiz and then export student answers to a Google Sheet, and have Flubaroo correct it. Students will not only have taken a teacher led quiz, but have their results right away.

Pear Deck has many possibilities. It is indeed interactive goodness for the classroom.

Saturday, March 19, 2016

Chromecast in the Classroom

If your in need of a projection solution for your classroom, consider using a Chromecast. A Chromecast is a great solution for not only projecting the contents of your Chromebook on a screen for all to see, but if you're using a tablet such as a Nexus 9 or Nexus 7, a Chromecast may be the way to go.

Connected to a projector, the Chromecast can project everything from a Youtube video you want to show to a Google Slides presentation. And, since it's wireless, the Chromecast allows you to be on the other side of the room with your Chromebook. If you're using a tablet, it allows you mobility. You can move about the room while the contents of your tablet are displayed. 

The Chromecast is easy to set up. Provided your projector has an HDMI port, simply plug the Chromecast into your projector and then into a power outlet. If your projector doesn't have an HDMI port, you'll need an adapter to plug the Chromecast into as well as the VGA cable into. Furthermore, if you go the adapter route, make sure and get an adapter with audio jack so you can plug in any speakers you wish.

Thursday, March 17, 2016

The iPad in the Classroom

The iPad, especially the iPad Air 2 because of its power, lightness, and beautiful screen , could be the only computer a teacher uses during the day. With the large availability of apps, the iPad can be an invaluable tool for a teacher. With that said, here's an example of a day in the life of an iPad in the classroom:

7:00 a.m. Open up "Calendar" to see if I have any meetings scheduled for the day.
7:15 a.m. Check school email by using "Safari" to navigate to the school's webmail server.
7:30 a.m. Open "Fantastical 2" and add any newly scheduled meetings found in email.
7:45 a.m. Open "Reminders" and add any email requested duties that need to be attended to.
8:00 a.m. Open "Keynote" and edit todays lecture.
8:30 a.m. Use "Pages" to create a worksheet for the students.
9:00 a.m. Classes begin. Use "Safari" to access the schools server and take attendance. Use "Keynote" to present lecture. Use the "YouTube" app to show a short video about World War II.
12:00 p.m. Lunch. Create a review crossword for the students puzzle using the "Puzzles" app.
3:00 p.m. School is out, but my day is hardly over. Post todays "Keynote" to the class website using the "Assigner" app.
3:01 p.m. Use "Twitter" to remind students of tomorrow's quiz.
3:15 p.m. Use the "ZipGrade" app to correct today's quiz.
3:45 p.m Review school email and add meetings to "Fantastical 2" and to-do's to the "Reminder" app.
4:00 p.m. Create tomorrow's lecture using "Keynote."
4:30 p.m. Homeward bound.

Wednesday, March 16, 2016

Google Classroom

First, let me get my true feelings out of the way. Google Classroom is fabulous! In a sense, it has reinvigorating my teaching.

Let’s take a step back. It’s very easy to fall into a rut as a teacher. I mean, you could be saying the same thing over and over, day in and day out, year after year. So, it’s easy to see that it’s fairly easy to get bored, and even burned out. Let me take you aside for a moment and tell you that I was in the sinking ship. I was stuck in the quicksand. I was trudging in the snow. I was…You get my drift (no pun intended). After almost 15 years of teaching, I needing to find new avenues of delivering the content I’ve been working with for years. So far, I think I’ve found it with Google Classroom.
What is Google Classroom you ask? It’s a revolutionary education tool designed for the 21st Century. Now, before I go on, let me tell you, I had heard of Google Classroom but never pursued looking into it. There was one thing that led me to investigate Google Classroom—paper. Yes, paper. You see, I like to keep the students engaged with a project or some other class exercise. Often times, these projects or class work involve drawing or something creative using blank sheets of paper. Needless to say, I go through a lot of paper. Plus, I’m not one to have them copy questions from the projection screen. To me, it’s too time consuming to have kids copy 20 questions. And, by the way, not all kids copy things down at the same speed (Google Classroom will address this as I will describe later). So, I was in the practice of photocopying the questions for them to either complete in class or take home. That’s lots o’ paper right there. Then, the other various things they would do include creating comic strips, pamphlets, flyers, magazines—all involve using copy paper. And I was all to happy to provide that for them. As you can probably see, I went through a lot of paper. It was the need to eliminate the use of paper that I turned to Classroom.
Google Classroom is the paperless environment that those teachers seeking to simplify their paperwork are looking for. Not only that, but it all but eliminates passing back papers. That’s right, no longer does a teacher need to take time just to pass back papers, and, heaven help you if you let papers that need to be passed back stack up. It could turn out to be a class period of passing back papers. You can send papers back with Classroom after you grade them. Student work can be sent back to their Google Drive. And, if giving a test using Google Forms (a part of Google Classroom), with a simple add on to Google Sheets, students can receive immediate feedback as tests are graded and returned back to their Google Drive. The other cool thing about the immediate test grading is that not only does Classroom give them their score, but informs the student which questions they missed and what the correct answers are. Awesome right?!
So what are the features of Google Classroom? After setting up your classes, you simply invite students to join your class. You can either email them a link or direct them to Google Classroom and provide them with a code to log in. Google Classroom features what they call the “stream”. The stream is the main area of Classroom where students can view and turn in assignments and view announcements that the teacher has made.
Google Classroom is a true jewel. If your schools has a Google apps account, I truly recommend checking out Google Classroom.

Tuesday, March 15, 2016

The Life of a Teacher Using Technology

Here I am, joining the blogging community!  I thought it would be a good idea to write about my school day while reflecting on my teaching.  I was inspired to blog through attending the Google for Education Summit.  I attended one of the sessions that talked not only about getting your students to blog about the class subject at hand, but why you, the teacher, should blog as well.
I thought what a great idea!  I should take up blogging about the trials and tribulations of being a secondary educator.  All the while, I could share what I'm doing in the classroom and hopefully get feedback.
So let's get started, shall we?

First off, as I said earlier, I recently attended a two day Google for Education Summit.  It was great to not only get around fellow educators who were eager to learn about technology and education, but to be around a bunch of fellow tech geeks.  I found the summit to be a great experience.  I picked up a couple of ideas that I look forward to implementing in my classroom, or should I say, the computer lab (more on that later).

One of those things that I'm excited to try out is called Pear Deck.  Pear Deck is essentially an interactive PowerPoint.  Students respond to questions or activities posed on the Pear Deck through their device.  Students can use a tablet, a phone, or a computer.  I think it's a great alternative to the lecture/taking notes thing.

I mentioned the computer lab.  Unfortunately, I don't have a classroom full of computers let alone Chromebooks.  So, what I have to do, as I'm sure many teachers out there have to do, is fight for a computer lab.  If I'm lucky, I can get in a lab a couple of times a week.  It's kinda frustrating because I would love to use Google resources much more often.

I'm a certified Google instructor.  That said, I'm eager to try out new internet technologies.  I really like Google Classroom for the students.  And, I'm saving tons of paper in the process.  I think the students are more engaged and apt to participate if they have a computer in front of them.

I'm keeping my fingers crossed to get a classroom set of Chromebooks in the near future, it sure would make my job more interesting for me and engaging for the students.